E-mail: info@gem-cablesolution.com
 Address: No.8 Yuefeng Rd, High Tech Zone, Dongtai, Jiangsu, China | No.109 Qilin East Rd, Daning, Humen, Dongguan, Guangdong, China.
 English
  English
 русский
 日本語
日本語 Español
 عربى
عربى 中文简体
中文简体
Content
The Definitive Answer on Correct Electrical Tape Application
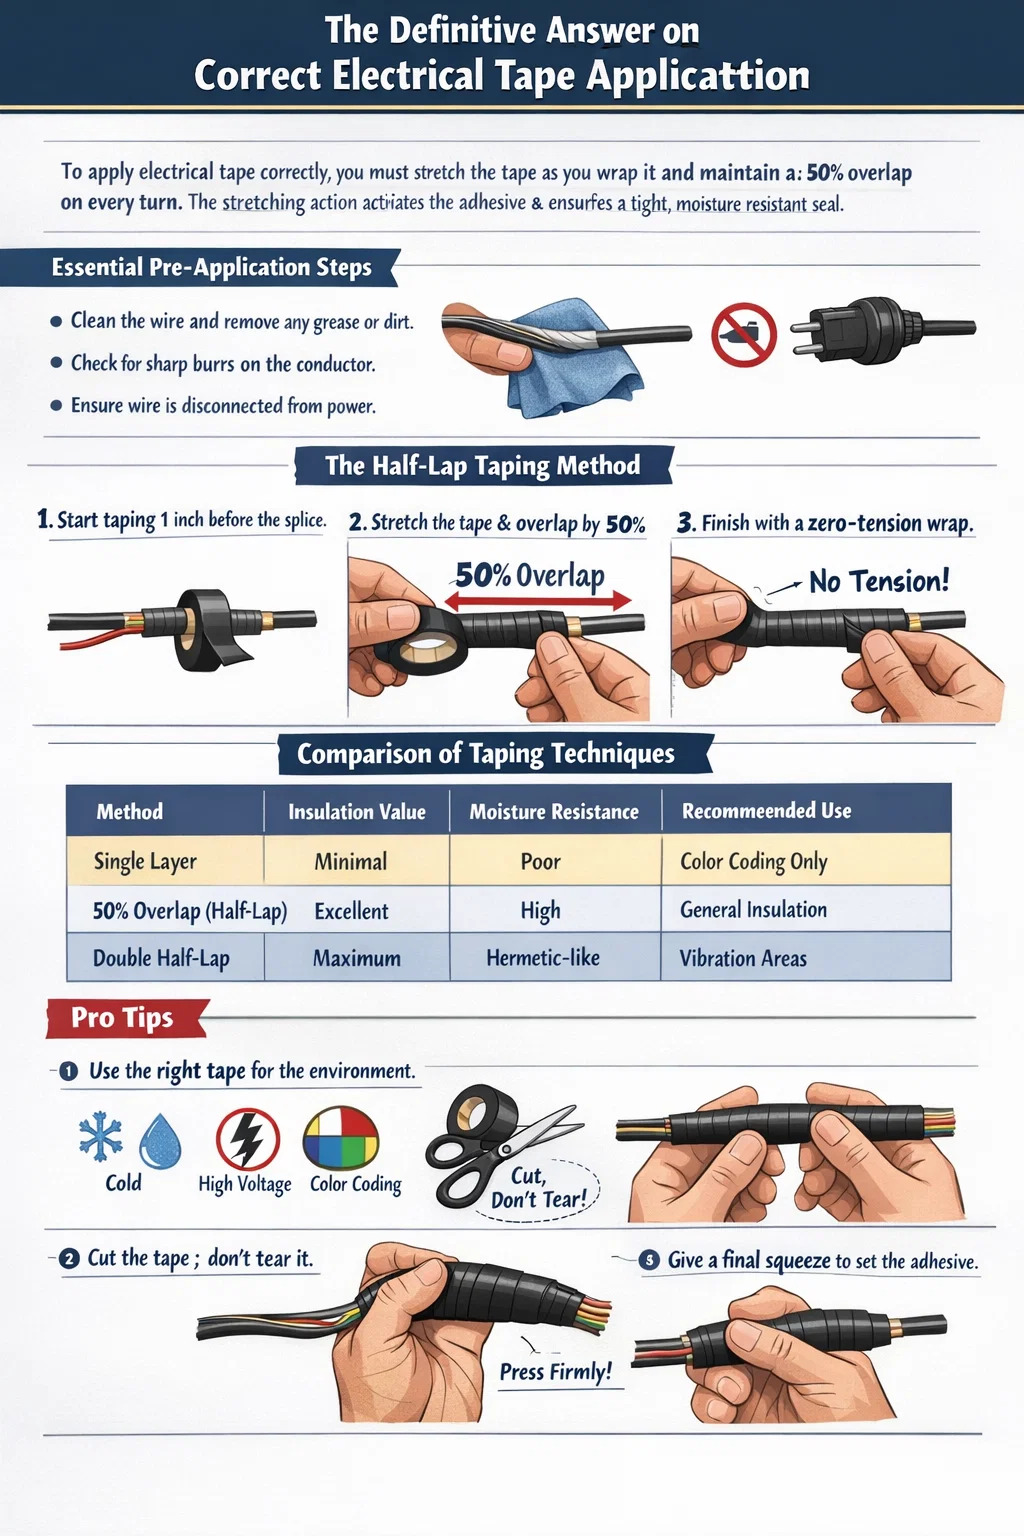
To apply electrical tape correctly, you must stretch the tape as you wrap it and maintain a 50% overlap on every turn. The stretching action activates the adhesive and ensures a tight, moisture-resistant seal, while the half-lap overlap provides a double layer of insulation that mimics the protective jacket created by a professional wire and cable extruder. Always finish with a "zero-tension" wrap on the final turn to prevent the tape from flagging or peeling back over time.
Essential Pre-Application Steps for Wire Safety
Before reaching for your roll of vinyl tape, the condition of the conductor is paramount. If the wire was improperly handled during installation, the insulation might have nicks that go deeper than the surface. Unlike the uniform coating applied by a wire and cable extruder, manual taping is subject to human error, so cleanliness is your first line of defense.
Cleaning and Inspection
Dust, oil, and moisture are the enemies of adhesive. If you are repairing a cable, wipe the area with a clean cloth. If there is grease present, a small amount of isopropyl alcohol can help. Ensure the wire is completely dry before proceeding, as trapped moisture can lead to corrosion inside the splice.
- Check for sharp burrs on metal strands that might puncture the tape.
- Ensure the wire is disconnected from any power source.
- Identify the voltage level to ensure your tape is rated for the task.
The Half-Lap Technique Explained
The gold standard for taping is the "half-lap." This means that each subsequent turn of the tape covers exactly half of the previous turn. This isn't just a suggestion; it is a structural requirement for electrical integrity.
| Method | Insulation Value | Moisture Resistance | Recommended Use |
|---|---|---|---|
| Single Layer | Minimal | Poor | Color Coding Only |
| 50% Overlap (Half-Lap) | Excellent | High | General Insulation |
| Double Half-Lap | Maximum | Hermetic-like | High Vibration Areas |
When you use the half-lap method, you are effectively creating a thickness that is two layers deep everywhere. This provides a safety margin in case the outer layer is scuffed or weathered. High-quality cables coming off a wire and cable extruder have a consistent wall thickness; your goal is to replicate that consistency manually.
Step-by-Step Mastery: How to Wrap
Follow these practical steps to ensure your fix is as permanent as possible.
- Start the wrap on the solid insulation of the wire, about one inch before the damaged area or the splice begins.
- Anchor the first turn with no tension to keep it in place.
- As you begin the second turn, pull the tape so it stretches. For most vinyl tapes, you should stretch it until the width of the tape narrows to about 75% of its original width.
- Continue wrapping at an angle, maintaining that 50% overlap.
- Once you reach one inch past the target area, start a second pass back toward the beginning if extra mechanical strength is needed.
- On the final turn, stop stretching the tape. Cut it with scissors rather than tearing it to avoid over-stretching the end. Press the final "tail" down firmly.
Why Tension and "Flagging" Matter
A common mistake is wrapping the entire length under high tension, including the very end. Vinyl has a "memory." If you stretch the tail end and stick it down, it will eventually try to shrink back to its original length. This results in "flagging," where the end of the tape peels up and waves like a flag.
In a industrial setting, a wire and cable extruder applies thermoplastic or thermoset materials that are chemically bonded or thermally fused to the core, so they never "unravel." Since tape relies on pressure-sensitive adhesive, that final zero-tension wrap is the only thing preventing the environment from compromising your work.
Choosing the Right Tape for the Environment
Not all electrical tapes are created equal. Using the wrong one is just as bad as applying it incorrectly. Standard black vinyl tape is rated for general use, but outdoor or high-heat scenarios require specialized materials.
- Cold Weather: Standard tape becomes brittle at low temperatures. Look for "all-weather" labels that remain flexible down to -18°C.
- High Voltage: For anything above 600V, standard vinyl is insufficient. You may need a rubber splicing tape as a base layer, which self-fuses into a solid mass, followed by vinyl for mechanical protection.
- Color Coding: While black is the most UV-resistant, using phased colors (Red, Blue, White) helps identify wires in a complex panel.
Remember that electrical tape is generally intended for 600 volts or less unless specified otherwise. In manufacturing, the insulation thickness is precisely controlled by the wire and cable extruder to meet these safety ratings. When you tape, you are the quality control manager, so don't skimp on the number of wraps.
Final Safety Checks After Taping
Once the tape is applied, give it a firm squeeze with your hand. The heat from your palm helps the adhesive set. Check the profile of the wrap; it should be smooth and tapered at the ends, not bulky and lumpy. If the wire needs to be pulled through a conduit using a fish tape later, a bulky or sticky tape job will likely snag, potentially stripping the insulation off and forcing you to start over with a fresh length of wire from the wire and cable extruder.